Some designs come from a brief. This one came from a logo.
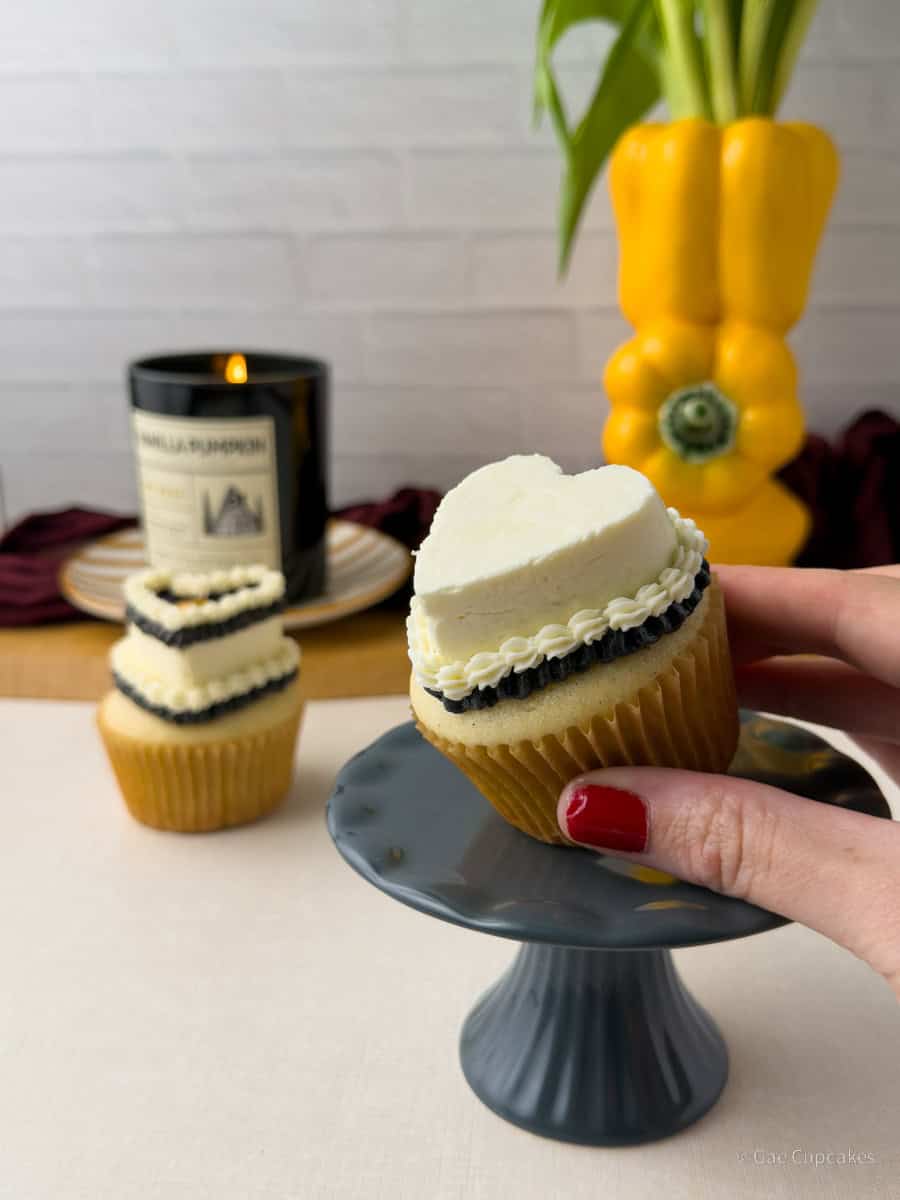
These cupcakes are my buttercream interpretation of the BakeBakePhilly logo - bold, tastefully alluring, and finished with classic vintage piping that's as deliberate as the brand itself. The goal was to capture her energy in frosting: proud, intentional, and a little bit witchy.
I made these for Christina of BakeBakePhilly to bring to the one-year anniversary celebration of her and Em Wilson's shared kitchen space in Philadelphia. Showing up with a cupcake version of someone's brand is a bold move. Watching it land felt even better.
If you love vintage buttercream techniques and want to create something elevated and deeply satisfying to pipe, this tutorial is for you. We're building a heart base, layering in classic piping details, and turning a logo into something you can eat.
In this tutorial, you'll learn:
- How to create a clean buttercream heart using a silicone mold.
- How to pipe a simple vintage-style cupcake with a soft, slightly witchy feel.
Christina Lower is the baker behind BakeBakePhilly, a Philadelphia micro bakery and cake studio known for her Big AF cookies and whimsical custom cakes. Her work has that "oh, this is a moment" energy: bold, playful, and full of personality.
One year ago, Christina and Em Wilson signed one of the most important documents you sign as an adult: a lease. Together, they took over a kitchen space inside Globe Dye Works, splitting rent and building something real in the Philadelphia baking community. This past weekend marked their one-year anniversary, a room full of bakers, good food, and the kind of energy you can't manufacture.
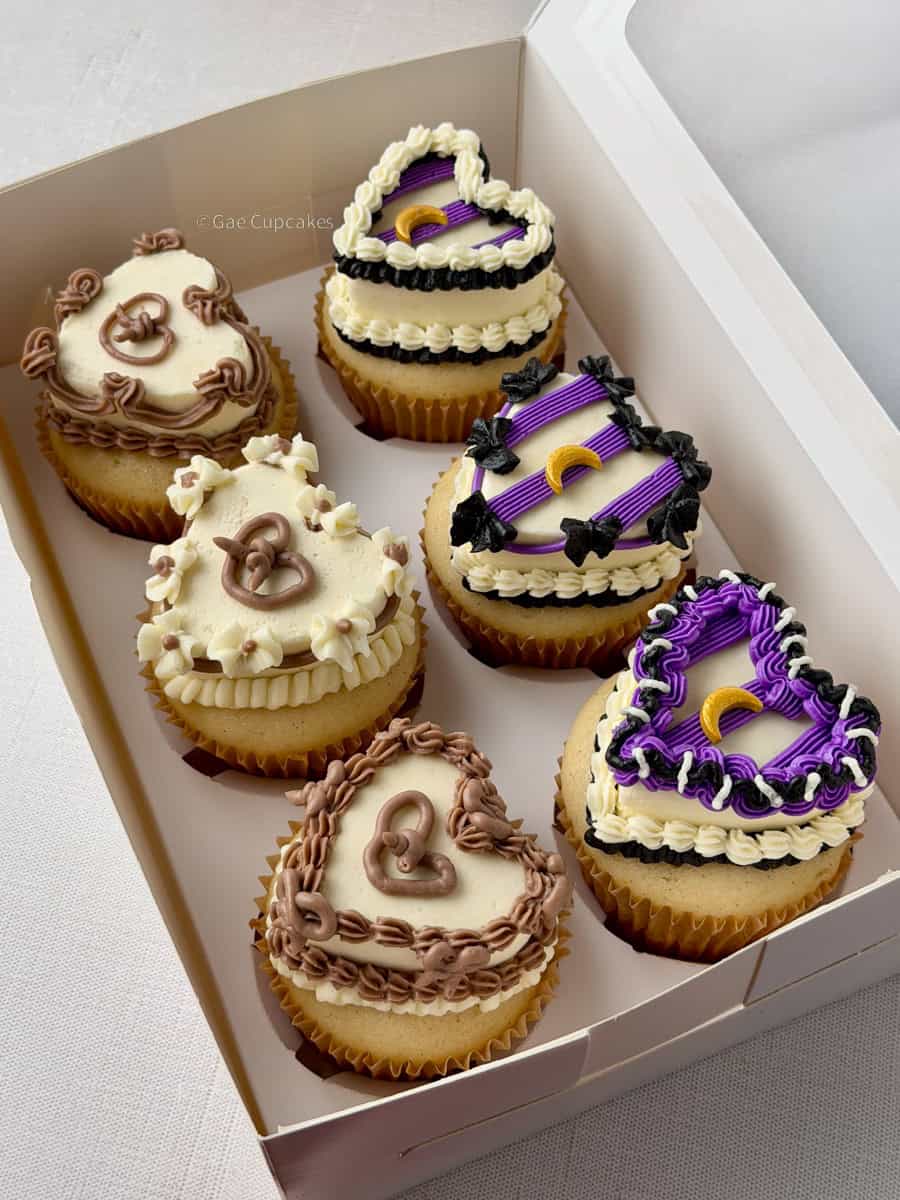
I showed up with two sets of cupcakes, one for Christina and one for Em. This one is Christina's. Inspired by her spooky, witchy logo, I wanted to translate that same confidence into buttercream.
This was also a test run for me. Real cupcakes, real feedback, real bakers in the room. There's something both vulnerable and exciting about that, and I'm so glad I showed up with these.
Jump to:
The Design
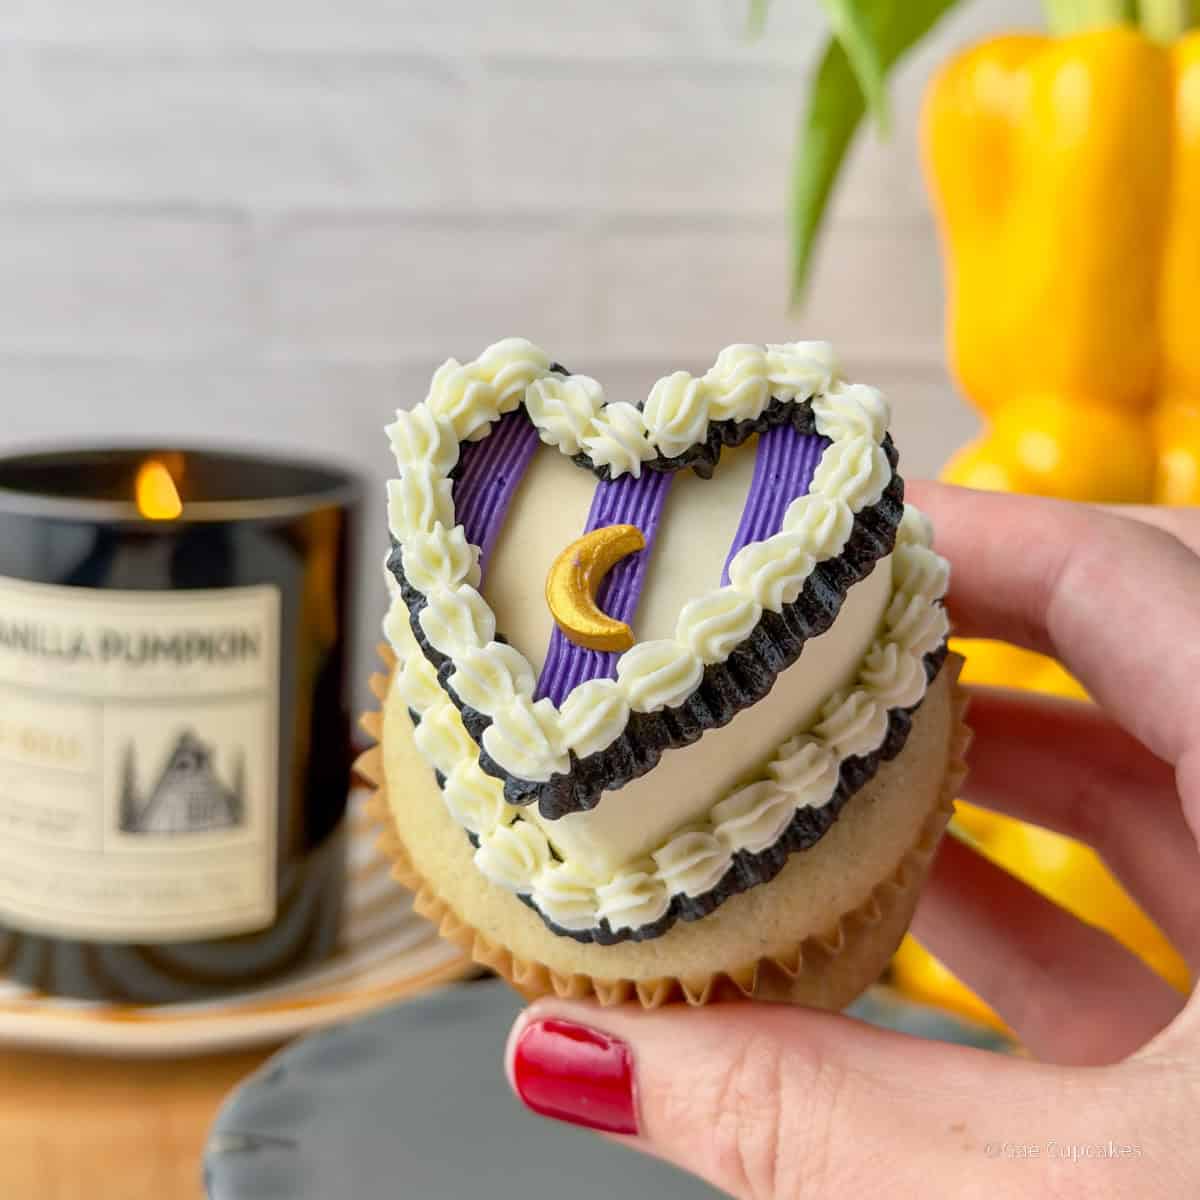
I started by flipping her color story. Where Christina leans into black with white details, I reversed it - white as the base, black as the accent.
Part of that choice was aesthetic, part practical. Black buttercream, especially when made with black cocoa, can easily overwhelm a design when it becomes the dominant color. Keeping white as the base lets everything stay clean and controlled while the black details add contrast without taking over.
Purple came in as the accent. It bridges the white and black without competing with either and brings in that soft, witchy, almost celestial energy that felt right for her brand.
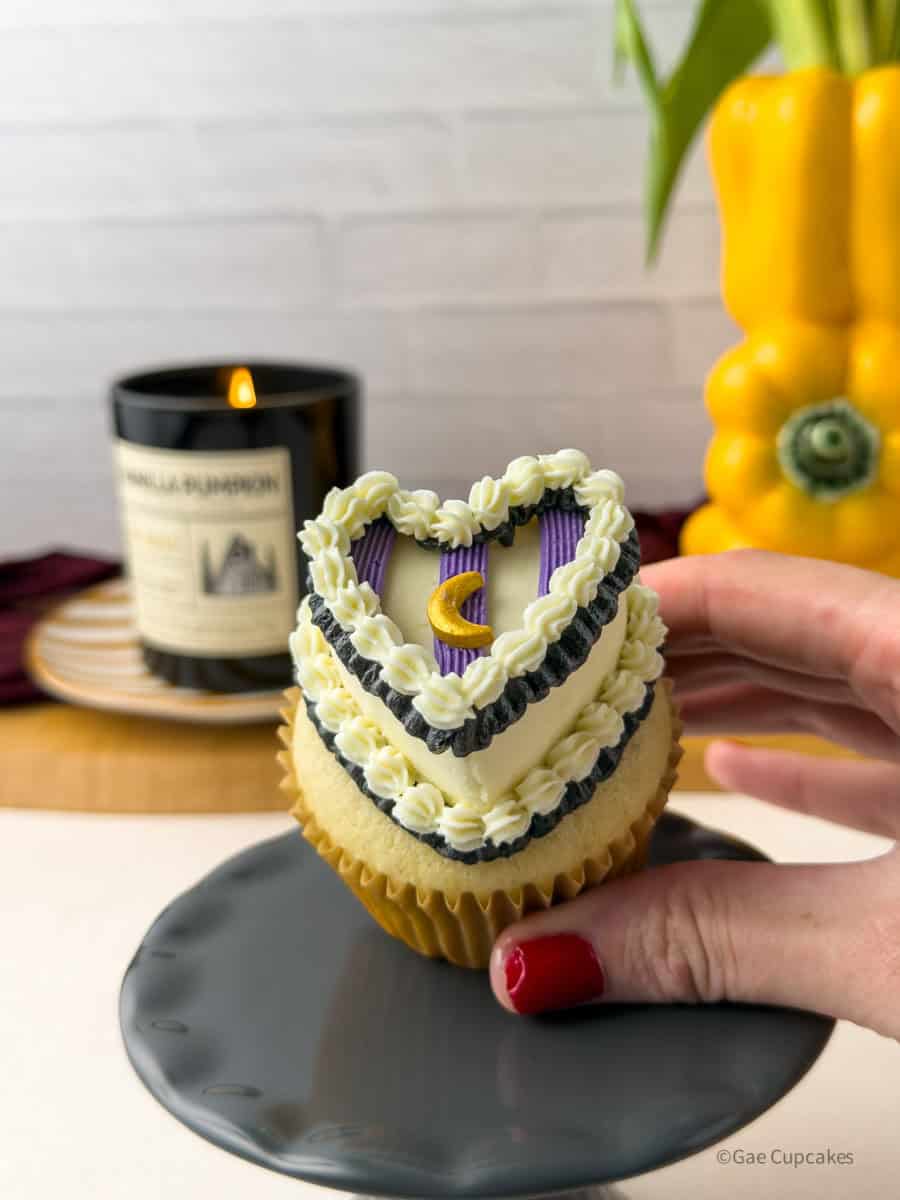
At the center of the heart sits a gold moon. Small, intentional, and exactly right. A nod to her aesthetic without being too literal. Every good witchy design needs a moon.
The piping style is vintage buttercream all the way - layered, textured, and decorative, but restrained enough to let the color story do the work.
Supply List
If you are a beginner baker, or an intermediate baker who has some but not all of the piping tips listed below, I recommend starting with a basic piping tip set. It includes all the core tips used in this tutorial and is something I still use in my own decorating.
Supplies are linked below where available. If you'd rather shop everything at once, I've linked my recommended piping tip set at the bottom of the tools list.
Buttercream
- Vanilla buttercream (white base)
- Black cocoa powder or black food gel
- Purple food gel
- White food gel (optional, for brightening)
Cupcake Decorating Supplies
- Heart baking silicone mold
- Piping bags
- Couplers for piping bags
- Spatula
- Vanilla cupcakes
- Wilton Piping Tip #14
- Wilton Piping Tip #16
- Wilton Piping Tip #44
- Wilton Piping Tip #47
- Gold moon sprinkles
- New to piping tips? Shop the full piping tip set I recommend here
Cupcake Decorating Instructions
Before you start piping, read through all the steps. Trust me on this one.
- Step 1 - Prepare your buttercream: Divide your vanilla buttercream into three portions. Color one white (primary base), one black or deep charcoal (secondary detail), and one purple (accent). Ensure your primary base color is at room temperature or slightly warm for smooth piping.
- Step 2 - Fill your piping bags: Insert a coupler into each piping bag. Transfer each buttercream color into its own bag using a spatula.
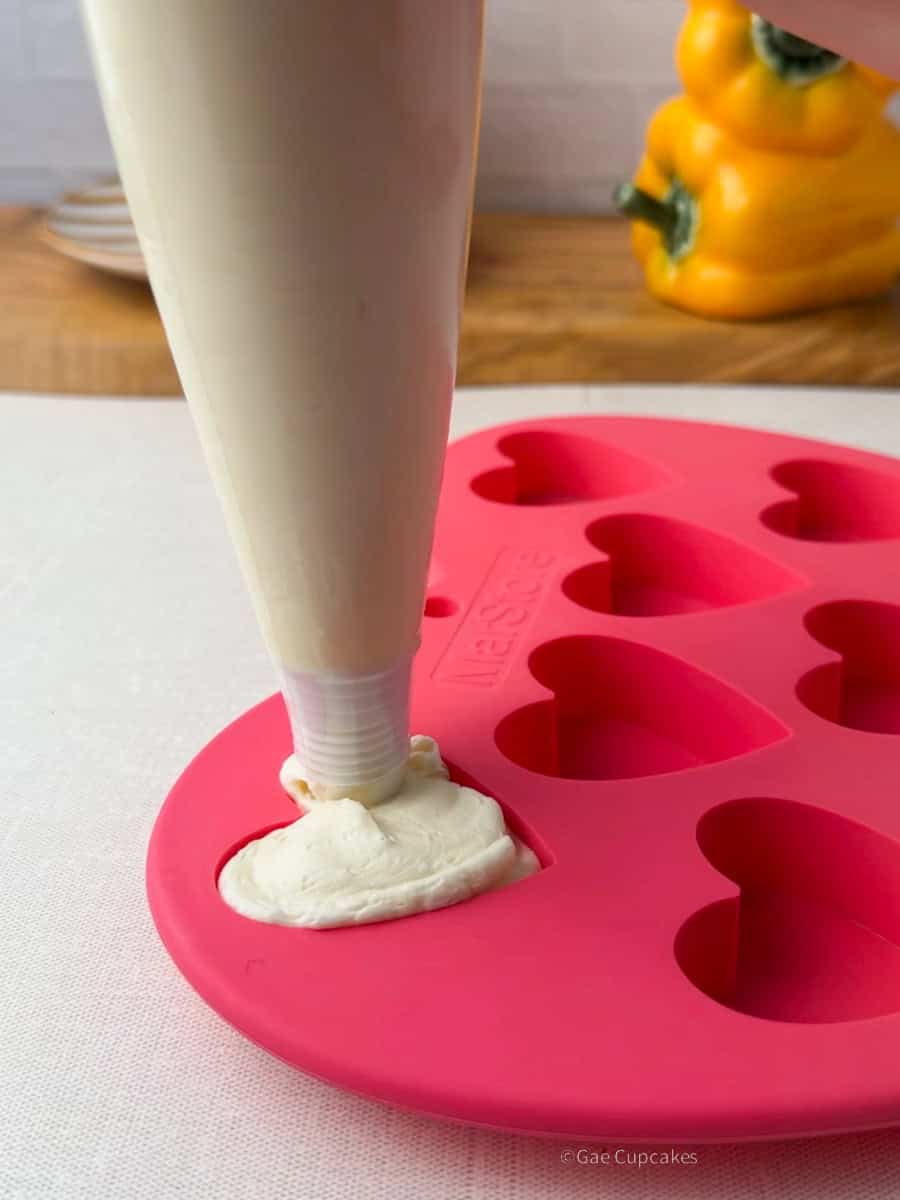
- Step 3 - Fill the heart mold: Using your white buttercream, pipe your base color into the heart-shaped silicone mold. Fill it to the top without overfilling, then tap the mold against your surface a few times to release any air bubbles.
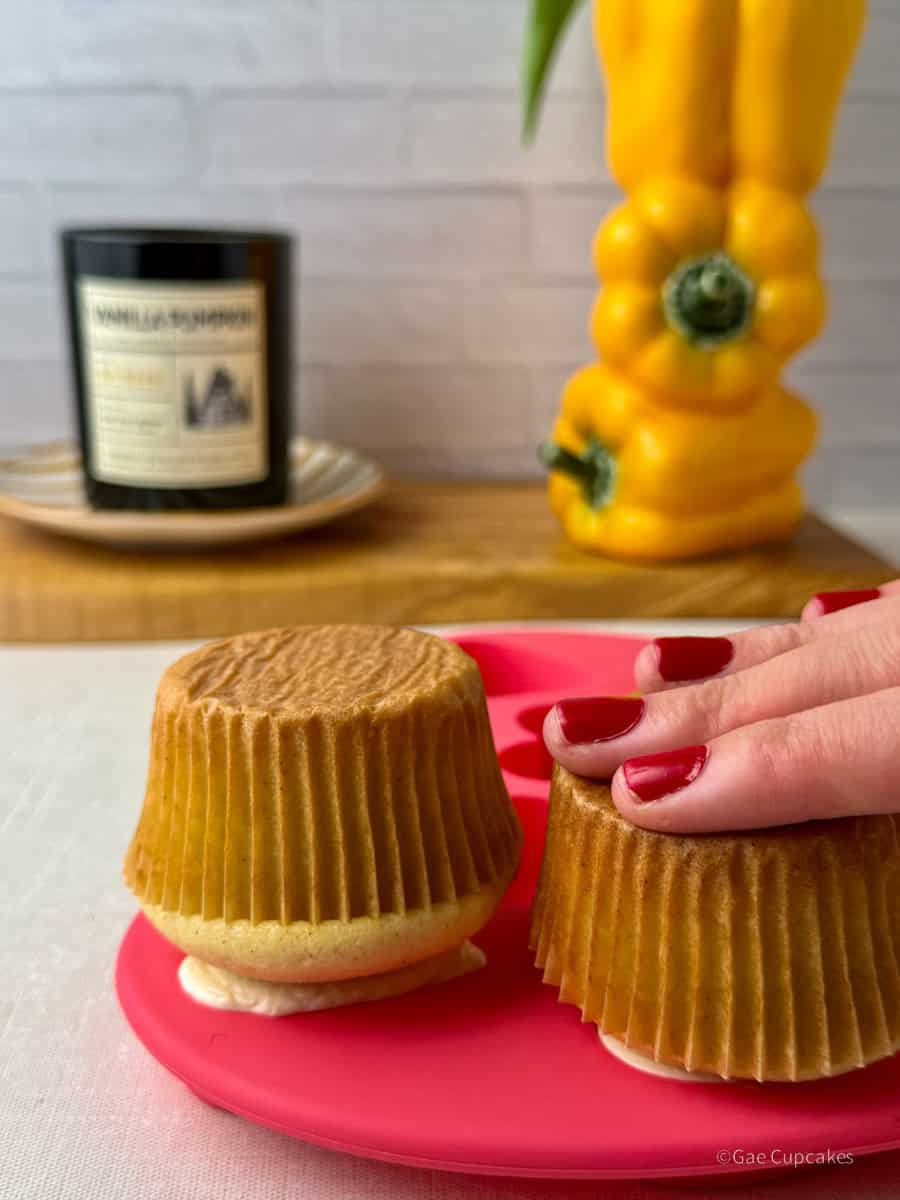
- Step 4 - Attach the cupcake: Place your vanilla cupcake face down onto the buttercream-filled mold. Press gently to ensure it adheres to the base.
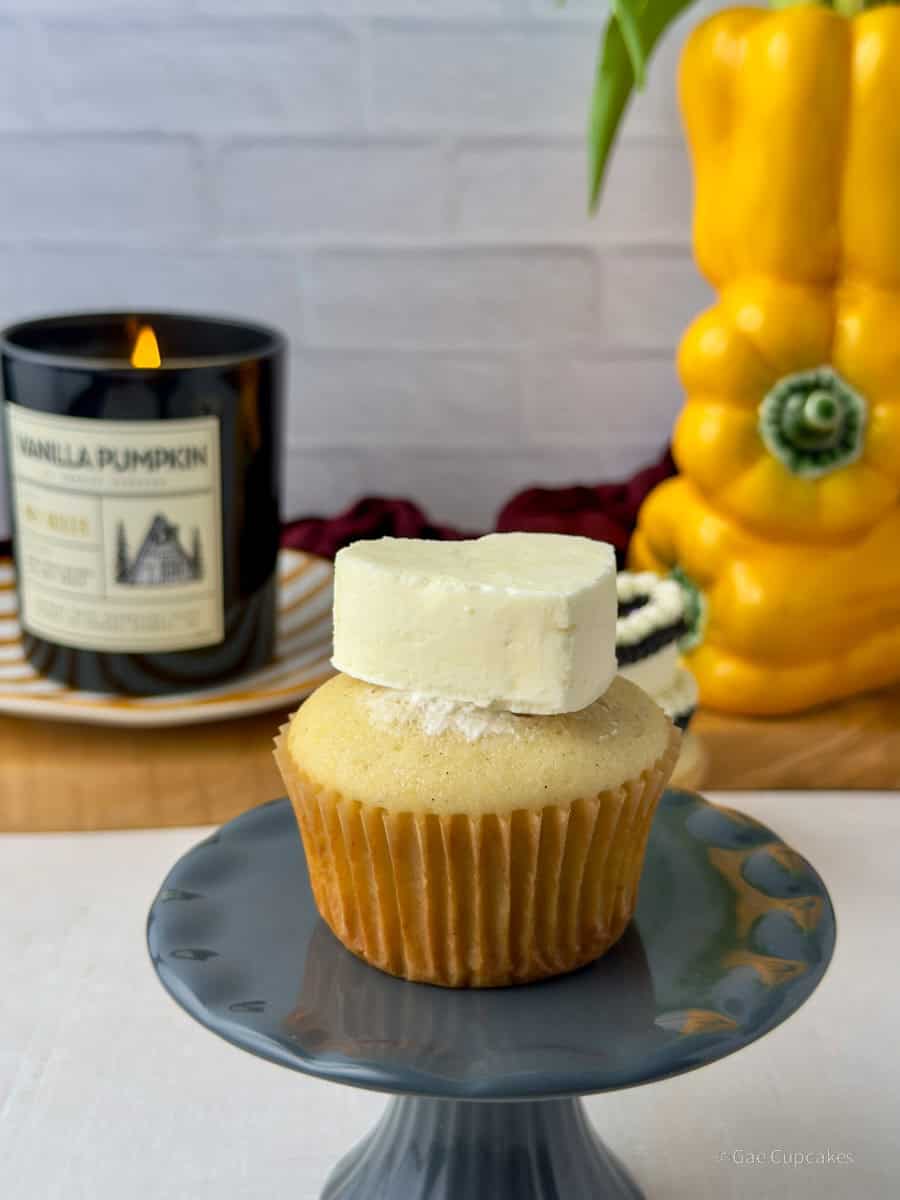
- Step 5 - Freeze and unmold: Place the cupcake in the freezer for 15 to 20 minutes until frozen and set. Carefully remove it from the mold, keeping the heart and cupcake intact. It's okay if it's a little messy - a butter knife cleans up the edges easily.
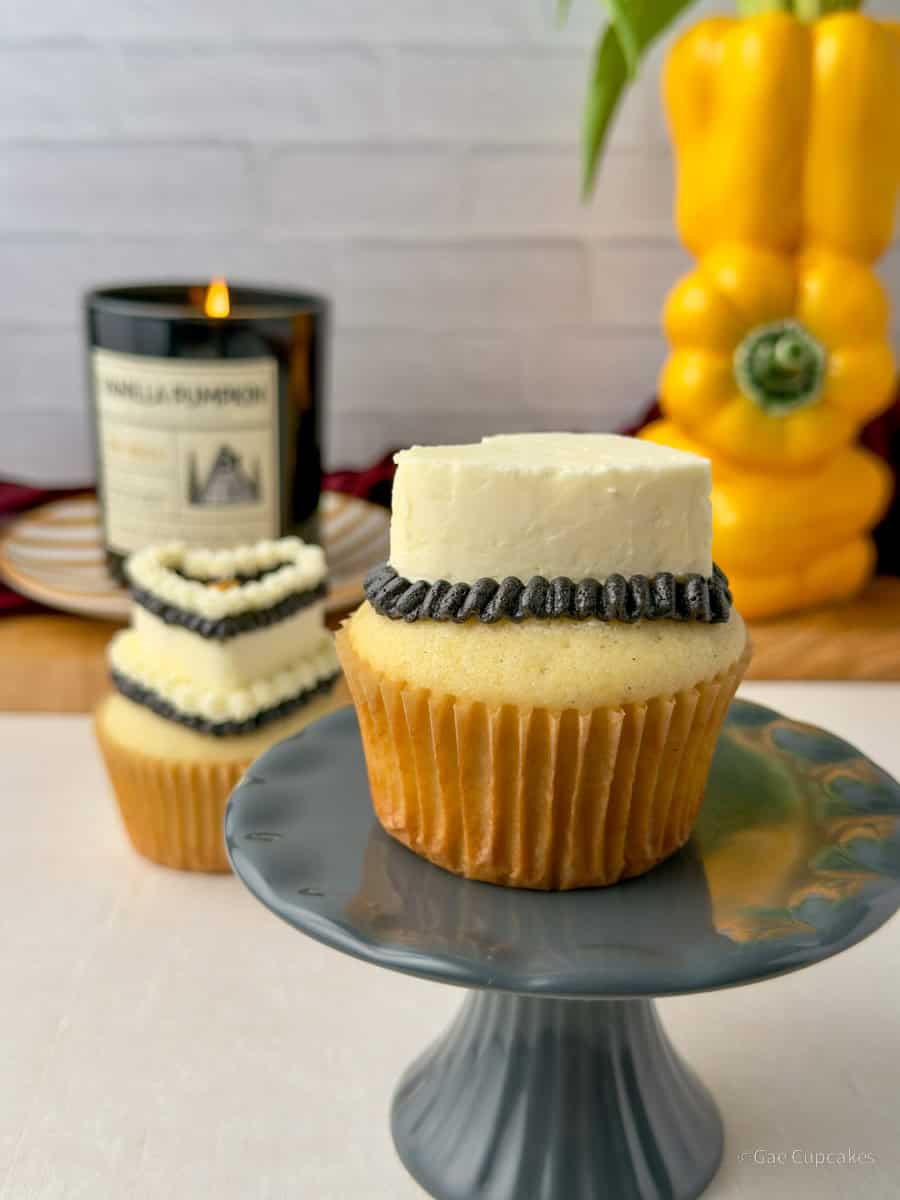
- Step 6 - Pipe the bottom border: Using black buttercream and Wilton tip #44, pipe a clean ribbon border along the bottom edge of the heart in a vertical wave motion, up and down.
- Step 7 - Add the shell detail: Switch to Wilton tip #16 and pipe a shell border on top of the ribbon border in a steady wave motion. This creates that layered vintage texture along the bottom edge.
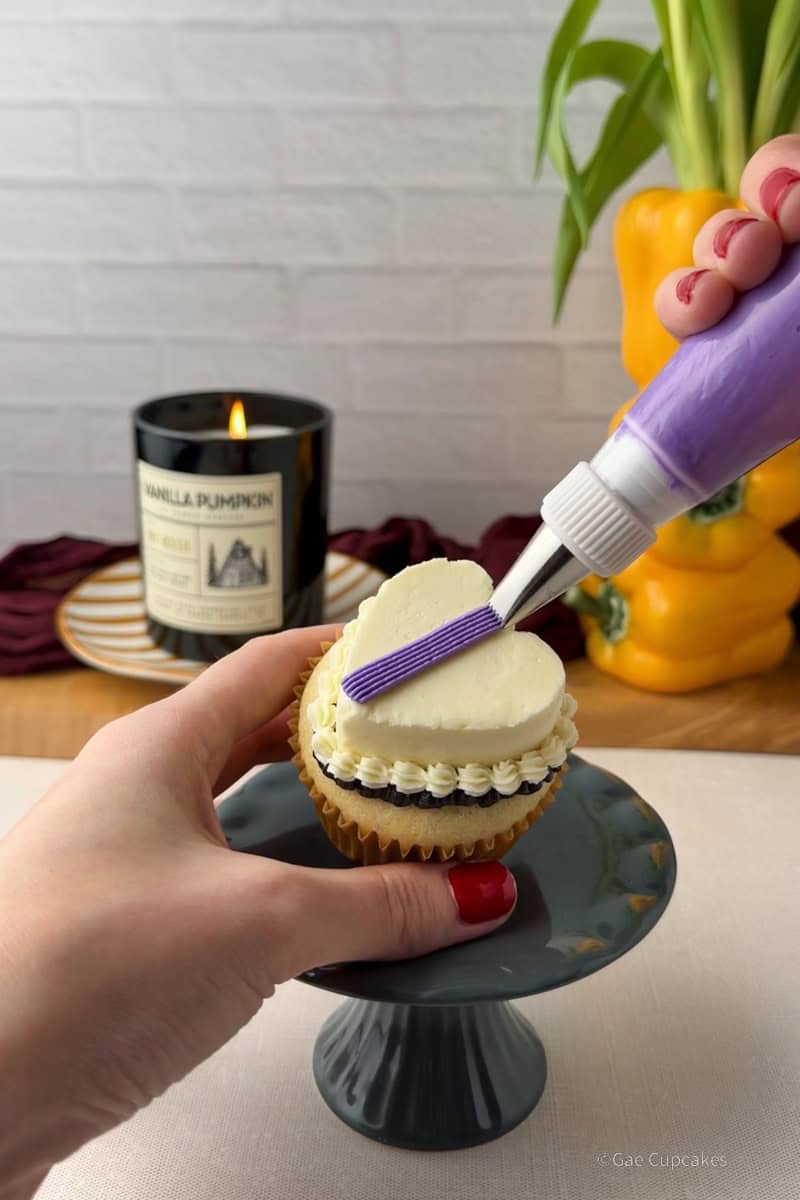
- Step 8 - Pipe the top purple stripes: Using Wilton tip #47 and purple buttercream, teeth facing up, pipe a stripe down the center of the cupcake with steady pressure. Then pipe one stripe on either side, dividing the cupcake into thirds.
- Step 9 - Trim the top purple stripes: Using a spatula held at an angle, trim the purple stripes to fit the shape of the heart mold and remove any excess buttercream.
- Step 10 - Add the top ruffle border: Using Wilton tip #44 and black buttercream, pipe a flat ribbon border along the top left and right edges of the heart, framing either side of the purple stripes.
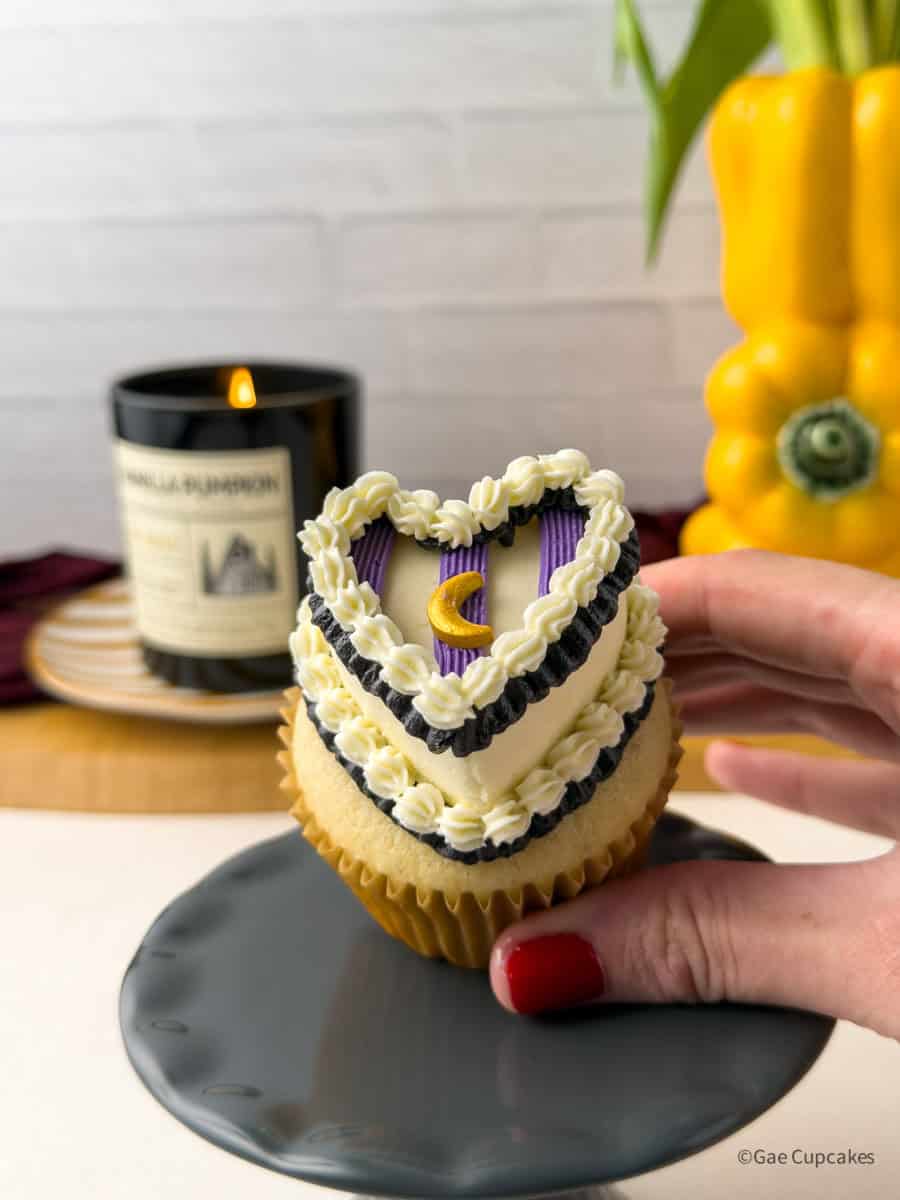
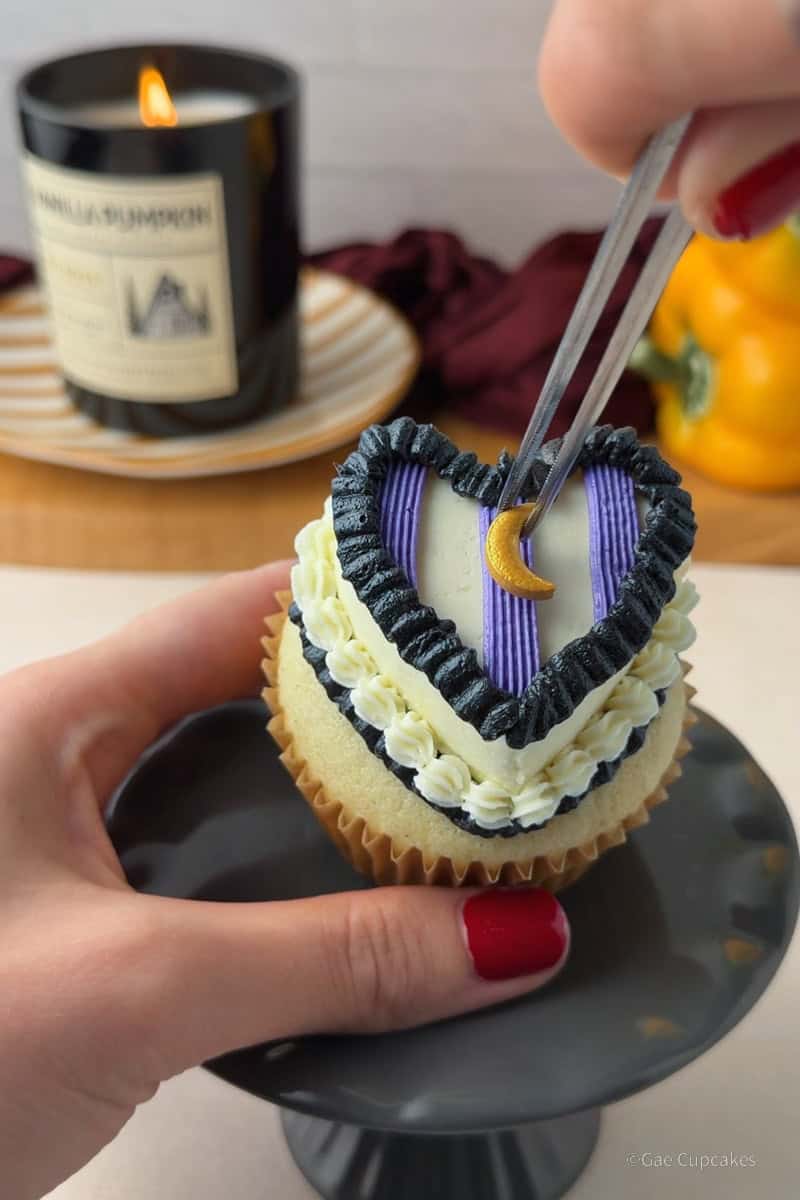
- Step 11 - Place the gold moon: Place the gold moon sprinkle in the center of the heart, on top of the purple stripe.
- Step 12 - Add the top shell border: Switch to Wilton tip #14 and pipe a shell border on top of the ribbon border in a steady wave motion. This finishes the layered vintage texture along the top edge.
Decorating Variations
Colors:
- This design works beautifully in any moody palette. Try deep green and gold for a forest witch vibe, burgundy and black for a gothic Halloween version, or swap the white base for ivory or cream for something softer and more romantic.
Theme:
- The gold moon can be swapped for any meaningful topper depending on the occasion or the person you're designing for - a star, a crystal, or a buttercream flower like a deep burgundy rose.
Silicone Mold Shapes
- The heart mold is the signature shape for Gae Cupcakes, but this design translates beautifully to other silicone molds too. Try a circular mold for a round mini cake, or a star mold for a more celestial feel.
Top Tip
Black buttercream can be colored using food gels or black cocoa powder. Black cocoa is alkaline, which gives the buttercream a dark grey base and means you need less gel to reach a true black. It also adds an Oreo-like flavor that pairs really well with the vanilla base - a pleasant little surprise. For a full standard batch of buttercream, I like to start with ½ cup (56g) of black cocoa powder, but the amount will vary depending on your batch size. Always let your black buttercream rest for at least 30 minutes after coloring. The color deepens as it sits.
FAQ
I used a moon sprinkle from a Wilton outer space-themed sprinkle set. If you can't find something similar, pipe a small moon shape using a round piping tip and dust it with gold luster dust once chilled.
I typically use a mock Swiss meringue buttercream. It has that light, not-too-sweet finish of a traditional meringue-based frosting, but comes together faster since it uses pasteurized egg whites instead of cooking them directly. It's my go-to when I have the time. When I'm in a pinch, American buttercream gets the job done.
My current rotation is Colour Mill, Americolor, and Progel. All three are gel-based, which I'd recommend over liquid food coloring. Liquid is what you'll typically find at the grocery store, but gel gives you more vibrant, consistent color without thinning your buttercream.
You want buttercream that's silky, light in color, and holds soft peaks - firm enough to keep its shape in the mold but soft enough to release cleanly. For American or Swiss meringue buttercream, I beat it in the stand mixer for 15-20 minutes until it's noticeably lighter and most of the air bubbles have worked out. If I'm working with mock Swiss meringue, an immersion blender until it turns glossy and reaches soft peaks works beautifully too.
Note to Christina
Christina, thank you for building something so beautiful in Philadelphia and for letting me translate a little piece of it into buttercream. Here's to year one and everything that comes after.
To anyone who isn't already following BakeBakePhilly: go fix that.
Related
Looking for other recipes like this? Try these:
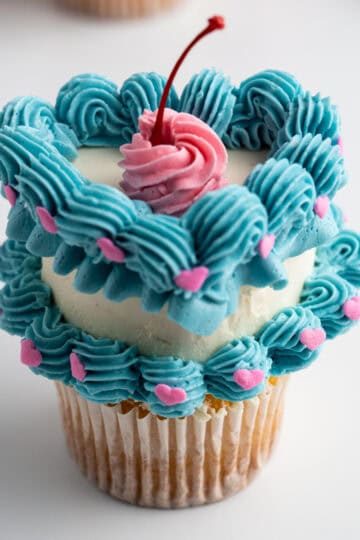

Simple Witchy Heart Cupcakes
Materials
Buttercream
- Vanilla buttercream (white base)
- Spatulas
- Black cocoa powder or black food gel
- Purple food gel
- White food gel (optional, for brightening)
Tools
- Heart baking silicone mold
- Piping bags
- Couplers for piping bags
- Wilton Piping Tip #14
- Wilton Piping Tip #16
- Wilton Piping Tip #44
- Wilton Piping Tip #47
- Gold moon sprinkles
Instructions
- Step 1 - Prepare your buttercream: Divide your vanilla buttercream into three portions. Color one white (primary base), one black or deep charcoal (secondary detail), and one purple (accent). Ensure your primary base color is at room temperature or soft consistency for smooth piping.Vanilla buttercream (white base), Black cocoa powder or black food gel, Purple food gel, White food gel (optional, for brightening)
- Step 2 - Fill your piping bags: Insert a coupler into each piping bag. Transfer each buttercream color into its own bag using a spatula.Piping bags, Couplers for piping bags
- Step 3 - Fill the heart mold: Using your white buttercream, pipe your base color into the heart-shaped silicone mold. Fill it to the top without overfilling, then tap the mold against your surface a few times to release any air bubbles.
- Step 4 - Attach the cupcake: Place your vanilla cupcake face down onto the buttercream-filled mold. Press gently to ensure it adheres to the base.
- Step 5 - Freeze and unmold: Place the cupcake in the freezer for 15 to 20 minutes until frozen and set. Carefully remove it from the mold, keeping the heart and cupcake intact. It's okay if it's a little messy - a butter knife cleans up the edges easily.
- Step 6 - Pipe the bottom border: Using black buttercream and Wilton tip #44, pipe a clean ribbon border along the bottom edge of the heart in a vertical wave motion, up and down.Wilton Piping Tip #44
- Step 7 - Add the shell detail: Switch to Wilton tip #16 and pipe a shell border on top of the ribbon border in a steady wave motion. This creates that layered vintage texture along the bottom edge.
- Step 8 - Pipe the top purple stripes: Using Wilton tip #47 and purple buttercream, teeth facing up, pipe a stripe down the center of the cupcake with steady pressure. Then pipe one stripe on either side, dividing the cupcake into thirds.
- Step 9 - Trim the purple stripes: Using a spatula held at an angle, trim the purple stripes to fit the shape of the heart mold and remove any excess buttercream.Spatulas
- Step 10 - Add the ruffle border: Using Wilton tip #44 and black buttercream, pipe a flat ribbon border along the top left and right edges of the heart, framing either side of the purple stripes.Wilton Piping Tip #44
- Step 11 - Place the gold moon: Place the gold moon sprinkle in the center of the heart.Gold moon sprinkles
- Step 12 - Add the top shell border: Switch to Wilton tip #14 and pipe a shell border on top of the ribbon border in a steady wave motion. This finishes the layered vintage texture along the top edge.
Leave a Reply