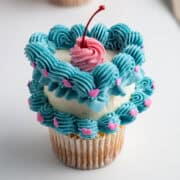
Prepare Your Buttercream: Divide your buttercream into two or three portions, depending on your design. Color each portion accordingly one as the primary base color, one as a secondary color, and, if using three, an accent color. Ensure your primary base color is at room temperature or slightly warm for smooth piping.
Room Temperature Buttercream or Frosting, Food Coloring
Fill the Piping Bag: Insert a coupler into a piping bag. Using a spatula, transfer the colored buttercream into the bag.
Spatulas, Piping Bags, Piping Couplers
Fill the Mold: Pipe the primary base color into a heart-shaped baking mold, filling it up to the top without overfilling. To remove air bubbles, gently shake the mold up and down.
Attach the Cupcake: Place the top of the cupcake face down onto the buttercream-filled mold. Press lightly to ensure it adheres to the buttercream.
Cupcakes
Freeze & Unmold: Freeze the buttercream heart cupcake for 15 minutes. Carefully remove it from the mold, ensuring the frosting and cupcake stay intact.
Pipe the First Top Border: Fit a Wilton #70 piping tip onto a piping bag filled with your secondary buttercream color. Pipe a steady, even border along the top edge of the buttercream heart.
Wilton #70 piping tip
Create a Shell Border: Swap the Wilton #70 tip for a Wilton #32 shell border tip. Pipe a wavy, shell-like pattern along the top border. Add sprinkles between the shells for extra decoration.
Wilton #32 piping tip
Decorate the Bottom Border: Repeat the wave motion along the bottom edge of the heart and add sprinkles on top of the shells.
Sprinkles
Finishing Touches: Using a Wilton #18 tip and pink buttercream, pipe a small swirl in the center of the heart. Place a cherry stem on top for an extra touch of flair.
Wilton #18 piping tip, Marshino Cherry Stem - optional